Obiee Admin Tool For Mac
Oracle Business Intelligence Enterprise Edition (OBIEE) is a Business Intelligence (BI) tool by Oracle Corporation. Its proven architecture and common infrastructure producing and delivering enterprise reports, scorecards, dashboards, ad-hoc analysis, and OLAP analysis provides a rich end-user experience. Founded in a basement in 1979, Epic develops software to help people get well, help people stay well, and help future generations be healthier.
- OBIEE Tutorial
- OBIEE Useful Resources
- Selected Reading
In OBIEE 10g, most of OBIEE administration tasks were mostly performed either through the Administration tool, the web-based Presentation Server administration screen, or through editing files in the filesystem. There were around 700 or so configuration options spread over multiple tools and configuration files, with some options like users and groups were embedded in unrelated repositories (the RPD).
In OBIEE 11g, all administration and configuration tasks are moved into Fusion Middleware Control also called as Enterprise Manager.
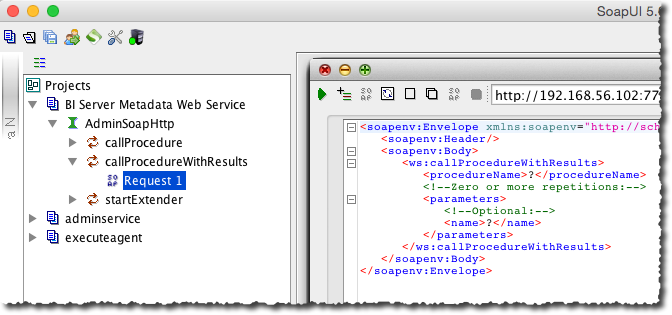
Administration tool that was present in OBIEE 10g is also present in 11g and is used to maintain the semantic model used by the BI Server. It has few enhancements in terms of dimension handling and new data sources. A major change is around security - when you open the Security Manager dialog −
Go to Manage → Identity → Security Manager Dialog box appears.
Users and Application Roles are now defined in the WebLogic Server admin console. Dng suite for mac. You use the Security Manager to define additional links through to other LDAP servers, register custom authenticators and set up filters, etc. In the above screenshot, the users shown in the users list are those that are held in WebLogic Server’s JPS (Java Platform Security) service, and there are no longer any users and groups in the RPD itself.
There is no administrator user in above snapshot. It has standard administrator user that you set up as the WebLogic Server administrator when you install OBIEE, which typically has the username weblogic.
There are also two additional default users: OracleSystemUser - this user is used by the various OBIEE web services to communicate with the BI Server and BISystemUser is used by BI Publisher to connect to the BI Server as a data source.
In Application Roles tab, you can see a list default application roles - BISystem, BIAdministrator, BIAuthor and BIConsumer - which are used to grant access to Presentation Server functionality.
Create a User in OBIEE
To create a new user, log on to the WebLogic Server admin console → Go to Security Realms from the Fusion Middleware Control menu → Select myrealm → Select Users and Groups. Click on Users tab, it will show you a list of existing users.
Click the New. → New user dialog box opens up → enter the user’s details. You can also use the Groups tab to define a group for the user, or assign the user to an existing group.
Configuration and Metadata Files
Following are the key file locations In OBIEE 11g −
RPD Directory
NQSConfig.INI
NQClusterConfig.INI
nqquery.log
nqserver.log
nqsserver.exe
WebCat Directory
instanceconfig.xml
xdo.cfg
sawlog0.log
sawserver.exe
Go to Overview. You can also stop, start and restart all of the system components like BI Server, Presentation Server etc. via OPMN.
You can click the Capacity Management, Diagnostics, Security or Deployment tabs to perform further maintenance.
Capacity Management
We have the following four options available for capacity management −
Metrics gathered via DMS.
Availability of all the individual system components (allowing you to stop, start and restart them individually).
Scalability is used to increase the number of BI Servers, Presentation Servers, Cluster Controllers and Schedulers in the cluster in conjunction with the “scale out” install option.
Performance option allows you to turn caching on or off and modify other parameters associated with response time.
Diagnostics − Log Messages show you view of all server errors and warnings. Log Configuration allows you to limit the size of logs and information gets included in them.
Security − It is used for enabling SSO and selecting the SSO provider.
Deployment − Presentation allows you to set dashboard defaults, section headings, etc. Scheduler is used to set the connection details for the scheduler schema. Marketing is for configuring the Siebel Marketing Content Server connection. Mail option is used for setting up the mail server to deliver for email alerts. Repository is used to upload new RPDs for use by the BI Server.
What is SAP HANA Studio?
SAP HANA Studio is an Eclipse based, integrated development environment (IDE) for development and administration of SAP HANA Database in the form of GUI tool.
SAP HANA Studio runs on client/developer machine and connects to SAP HANA Server. SAP HANA Studio can access local or remote SAP HANA Database.
By using SAP HANA Studio we can –
- Enables user to manage the SAP HANA Database.
- Create and manage user authorizations.
- Create New or modify existing models of data.
In this tutorial, you will learn-
Pre-Requisite for SAP HANA Studio
Supported Platform
SAP HANA Studio runs on below platform –
Microsoft Windows x32 and x64 versions-
- Window XP
- Window Vista
- Window 7
- Window 8
- SUSE Linux Enterprises Server: x86 64 Bit version, Red Hat Enterprises Linux (6.5).
- Mac OS 10.9 or Higher.
System Requirement
- JAVA JVM – During Installation and updating of SAP HANA Studio, a JVM is installed or updated.
- SAP HANA Client – It is software, by which you will be able to connect any other database, application.
- SAP HANA Client can be installed on Unix / Linux and Microsoft Windows and also on SAP HANA Server host during server installation. SAP HANA Client installed separately from SAP HANA studio.
Download & Install SAP HANA Studio
Installation Path
The default installation on system path according to OS and their version is as below –
- Microsoft Window (32 & 64 bit)- C:Program files saphdbstudio.
- Linux x86, 64 bit - /user / sap / hdbstudio.
- Mac OS , 64 bit - /Applications / sap / hdbstudio.app
Software Download
You can download SAP HANA Studio and SAP HANA Client from here
Select File To Download according to your OS –
Installation on Microsoft Window
Install SAP HANA Studio in the default directory with administration privileges or in user home folder without administration privileges.
Click on hdbsetup.exe for installing SAP HANA studio.
A SAP HANA Lifecycle Management Screen appears.
Default installation folder is C:/Program Files / SAP / hdbstudio.
Step 1) Define Studio Properties
- Select install new SAP HANA Studio.
- Click on Button.
Select Features screen appear as below –
Step 2) Select features
- Select Features screen are used to select features.
- Select Feature as below -
- SAP HANA Studio Administration – Toolset for various administration task, Excluding Transport.
- SAP HANA Studio Application Development – Toolset for developing SAP HANA native Applications (XS and UI5 Tools excluding SAPUI5).
- SAP HANA Studio Database Development – Toolset for content development.
- Click button.
Step 3) Review and Confirm
- Review & Conform Screen appears.
- Summary of SAP HANA Studio Installation display.
- Click on Button.
Step 4 & 5) Install Software and Finish.
- Installation Progress screen appear and after it goes to finish page.
- A Message 'You have successfully installed the SAP HANA Studio'.
- Click on button.
Run SAP HANA Studio
Now, go to Default installation folder is 'C:/Program Files / SAP / hdbstudio'.
There is hdbstudio.exe file, by right clicking on it, you can create a shortcut on the desktop.
When you click 'hdbstudio.exe' file, it will open Workspace Launcher screen displayed below.
- Workspace is selected by default. We can change Workspace location by Browse option. Workspace is used to store studio configuration settings and development artifacts.
- Select 'Use this as the default and do not ask again' option to prevent popup this screen every time for workspace selection when we open SAP HANA Studio.
- Click Button.
SAP HANA Studio Welcome screen appear -
In the Welcome screen different perspective is displayed, Detail of each perspective is as below –
Administration Console Perspective
This screen is used to configure, administration and monitoring the SAP HANA Database. Several View and editor are available in SAP HANA Administration Console.
System View Toolbar is used for Administration; it looks like as below –
Below is a Table showing System-level editors and views available in SAP HANA Administration Console.
| View/ Editors | Detail | Path | image |
| Systems | The System view provides hierarchical view of all the SAP HANA System managed in SAP HANA Studio with their contents (catalog, content, etc.) | Window-> Show View -> System | |
| System Monitor | System Monitor is an editor which provides an overview of all SAP HANA Database at one screenshot. We can see the detail of the individual system in System Monitor by drill down. | Button on System View Toolbar. | |
| Administration | This is used for performing administration and monitoring task. | 1. From The System Toolbar. 2. By double click on System. | |
| Administration Diagnosis Mode | This editor is used in case of emergency to perform monitor and operation on the system in which either No SQL connection available or the SQL connection overload. | 1. From click Administration tool list icon. 2.Ctrl+Shift + O | |
| Backup | Used in performing Backup and Administration. | Expand the system and choose backup. | |
| Security | This editor is used for managing below topic- 1.Password Policy 2.Data Volume Encryption | Security option from Security views of the system. | |
| SQL Console | Used for Entering, Executing and analyzing SQL statement in SQL Console. | From the System Toolbar Choose SQL |
Modeler Perspective
This perspective is used to create modeling objects, database object management in SAP HANA System. This perspective used by modelers for the following activity –
- Create / Modify Tables, Functions, Indexes, View, Sequences, Synonym, Trigger, Views.
- Create Modelling object like Attribute View, Analytic View, Calculation View, Analytic Privileges, Procedures and Decision Table.
- Data Provisioning to SAP HANA database from SAP / NonSAP Source through SLT, BODS, DXC.
Development Perspective
This Perspective is used to develop an application on HANA for the web environment. In this Perspective programming language is used – Java Script, J Query, ODATA, etc.
Lifecycle Management Perspective
This screen is used to Install and Update software regarding SAP HANA Database and SAP HANA Studio. Lifecycle management is also used to transport an object from one HANA system to another HANA System.
Add System in SAP HANA Studio
To work with SAP HANA Database user needs to be connected with SAP HANA database from SAP HANA Studio. So we build a connection to SAP HANA DATABASE as below –
Step 1) Click on 'Add System' icon from System Toolbar as below-
Step 2) Provide the following detail as below –
- Host Name – Enter SAP HANA database here.
- Instance Number – Two Digit Instance number.
- Description – Description of the system for better understanding
- Click on button.
A connection properties screen appears in which we need to enter SAP HANA Database User and Password.
- Enter Username and Password for SAP HANA Database for access it from SAP HANA Studio.
- Click button.
If there is no error, then the connection is successful, and System name is added in SAP HANA Studio under System Node.
Work With SAP HANA Studio
To login in SAP HANA Database through SAP HANA Studio, follow below steps-
- Click on Added System. Here' DB (HANAUSER)'.
- A popup screen for User Name/ password. Enter User Name and Password for HANA Database.
- Click on Ok button.
After Login to SAP HANA Studio, We get below screen for selected HANA System.
In Hana Studio under HANA System following sub-nodes exits-
Catalog
SAP HANA Studio Catalog node represent SAP HANA data dictionary, in which Database object (Table, View, Procedure, Index, Trigger, Synonyms, etc.) stores in Schema Folder. When the user is created in SAP HANA, Schema of the same name will be created in SAP HANA Database by default. This is a default schema of user when a user creates any database object. Schema is used to group database object.
Schema defines a container that hold database objects such as Table, Views, Trigger, Procedure, Sequence, Function, Indexes, Synonyms, etc.
Schema can be created in SQL Editor by below SQL-
Here 'SCHEMA_NAME' AND 'USERNAME' Should be changed according to Requirement. After Refresh Catalog Node Newly Created Schema will be displayed.
I have created Schema 'DHK_SCHEMA' by it in-front SQL.
All Database Object are stored in respective folder of Schema as below –
Provisioning
Provisioning is used for selecting source Meta data and importing metadata and data into SAP HANA.
There are two categories of provisioning, they are -
- SAP HANA In-Built Tool (Flat file, Smart Data Access, Smart Data Streaming, etc.)
- External Tools (SLT, BODS, DXC, etc.)
In SAP HANA Studio Provisioning node, SAP uses a new feature called, 'Smart Data Access' which is Built in Tool.
Smart Data Access combines data from heterogeneous data sources like Hadoop, Teradata, Oracle, and Sybase.
Data from different sources will store in SAP HANA database as 'Virtual Table'. The restriction with virtual tables is, it can be only used to build calculation views in SAP HANA.
Content
Content Node is Design Time Repository, which hold all information of data models in the package. All information view e.g.(Attribute View, Analytic View, Calculation View, etc.) will be created in Package under Content Node.
The package is used for grouping related information object in a structured way. The package can be created by clicking right click on Content Node ->New->Package.
Security
Security Node in SAP HANA Studio contain 3 Sub-node, they are –
- Security – Used for Create User Audit Policy, Password Policy, etc.
- Users – Used for create/Modify/Delete user. Role and Privileges will also grant to user from this screen.
- Roles – Used for Create/Modify/ delete Roles. Privileges are added/deleted from here to Role.