Download Openjdk 7 For Mac
$ sudo apt-get install openjdk-7-jre. The openjdk-7-jre package contains just the Java Runtime Environment. If you want to develop Java programs then install the openjdk-7-jdk package. Fedora, Oracle Linux, Red Hat Enterprise Linux, etc. On the command line, type: $ su -c 'yum install java-1.7.0-openjdk'. Oct 08, 2019 In this tutorial, I will show you how to install OpenJDK 13 Mac. You have to pay for Oracle JDK so it’s better to use OpenJDK. OpenJDK (Open Java Development Kit) is a free and open-source implementation of the Java Platform, Standard Edition (Java SE). 1 It is the result of an effort Sun Microsystems began in 2006.
Newest post on how to install Oracle JDK 8 / Java SE 8 on Mac OS X 10.10 Yosemite can be found here.
At the time of this writing, there is no official release of Java SE 7 / Oracle JDK 1.7 on Mac OS X. It is still in developer preview based on Apple’s contributions to OpenJDK. The Developer Preview is provided to the community so that the developers can get feedback on the ongoing progress of the project. The developer preview should work on any Intel-based Mac and has been tested on Mac OS X 10.6.8 (Snow Leopard) and 10.7 (Lion).
UPDATE
Oracle has launched the official Java SE 7 for Mac OS X 64-bit platform. You can download it from here.
This tutorial shows you how to install Java SE 7 Developer Preview on Mac OS X 10.7.2 Lion running on my MacBook Pro.
1. Download the Oracle JDK7 Mac OS X port dmg file from here. At the time of this writing, the version of the JDK7 is Oracle JDK7 build b223 released on December 23, 2011. The dmg file name is jdk-7-ea-macosx-b223.dmg
2. Create a JavaVirtualMachines folder under /Library/Java if it doesn’t exist.
In my case, the JavaVirtualMachines is already there so I don’t need to create it manually.
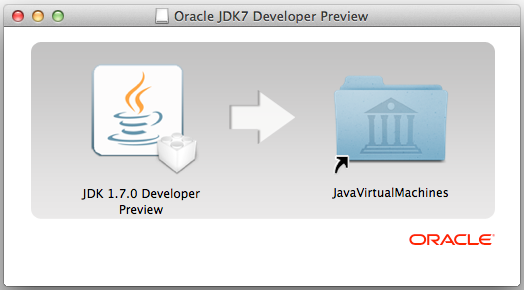
3. Open the jdk-7-ea-macosx-b223.dmg file by double-clicking on it. Then drag the JDK 1.7.0 Developer Preview icon in the left side to the JavaVirtualMachines icon folder in the right side.
4. Go to /Library/Java/JavaVirtualMachines directory using Finder application. Then double-click the ‘JDK 1.7.0 Developer Preview’ icon. This will open the Java Preferences window. Here you can change the preferred order of the installed Java platforms by dragging it up or down. Make sure the Java SE 7 is in the preferred order or you can simply deselect the Java SE 6 version.
5. Now issue the ‘java -version’ command in the terminal window to verify.
6. Done
-->Azul Zulu Enterprise builds of OpenJDK are a no-cost, multi-platform, production-ready distribution of the OpenJDK for Azure and Azure Stack backed by Microsoft and Azul Systems. They contain all the components for building and running Java SE applications.
There are multiple download package types supported for each client OS. You can also get a virtual machine image from the Azure Marketplace Gallery for the following platforms:
Note
These instructions target the 64-bit Java 8 version of the JDK. Azul also provides the Java Run-time Environment (JRE) as a stand-alone installation. The JRE is included with the JDK install.
Java 11 packages are also provided on Azul's Azure downloads page.
Download and install the Azul Zulu JDKs for Windows
Download the 64-bit Azul Zulu JDK 8 as an MSI to a location on your client, such as
C:Users<your_login>Downloads. (.ZIP packages are also provided on Azul's Azure downloads page.)Navigate to the directory and double-click the downloaded MSI file to begin installation.
Download and install the Azul Zulu JDKs for Mac
These steps download a ZIP file to your Mac. There is also a DMG version available.
Download the 64-bit Azul Zulu JDK 8 as a ZIP file to a location on your client, such as
/Library/Java/JavaVirtualMachines/. (.DMG packages are also provided on Azul's Azure downloads page.)Launch Finder, navigate to the download directory, and double-click the ZIP file. Alternatively, you can launch a terminal command window, navigate to the directory, and run:
Download and install the Azul Zulu JDKs for Alpine Linux
Download the 64-bit Azul Zulu JDK 8 as a TAR file to a location on your client, such as
/usr/lib/jvm. (.RPM and .DEB packages are also provided on Azul's Azure downloads page.)Go to your directory and run the following command to unzip and expand the file:
Confirm your installation
To confirm your installation, go to the command-line and run java -version.
The output of the command should be:
Download and install the Azul Zulu JDKs from a Yum repository
The Azul Zulu JDKs are provided in a Yum repository by Azul.
To install the Azul Zulu JDK for Java 8, run the following commands from your CLI:
For Java 11, run:
For Java 12 (Preview), run:
To update a Zulu JDK 8 package from a Yum repository:
(Change the version number in the command above if you are using versions 11 or 12.)
To remove a Zulu JDK 8 package from a Yum repository:
(Change the version number in the command above if you are using versions 11 or 12.)
Download and install the Azul Zulu JDKs from an apt-get repository
The Azul Zulu JDKs are also provided in an apt-get repository by Azul.
To install the Azul Zulu JDK for Java 8 with apt-get, run the following commands from your CLI:
For Java 11, run:
For Java 12 (Preview), run:

Prelight for mac. To update a Zulu JDK 8 package from an apt-get repository:
The previous release will be automatically removed.(Change the version number in the command above if you are using versions 11 or 12.)
To remove a Zulu JDK 8 package from an apt-get repository:
(Change the version number in the command above if you are using versions 11 or 12.)
For more detailed guidance on preparing, installing, and managing your Azul Zulu JDKs for Azure development, read the official Zulu docs.